









How to
An Enquiry Page is a public form that your customers fill in. Each form they send arrives in Ascora as an Enquiry, ready to convert to a Quote or a Job. You can keep one page, or a separate page for each place Enquiries come from, such as your website, a campaign or a service line.
This article is for Administrators. It covers adding pages, the links for your website, the wording, Custom Fields, styling, the Marketing Opt-In tickbox and the email your customer receives.
Before you start
- Enquiry Pages is for Administrators.
- The Custom Fields tab of a page needs Custom Fields in your subscription. Without it, the tab tells you so and the rest of the page works as usual.
- There is nothing to switch on. The page you already had is now your Default page, with all of its settings, and the links and buttons already on your website keep opening it.
Open Enquiry Pages
Go to Administration > Integrations & API > Enquiries Page/Panel.
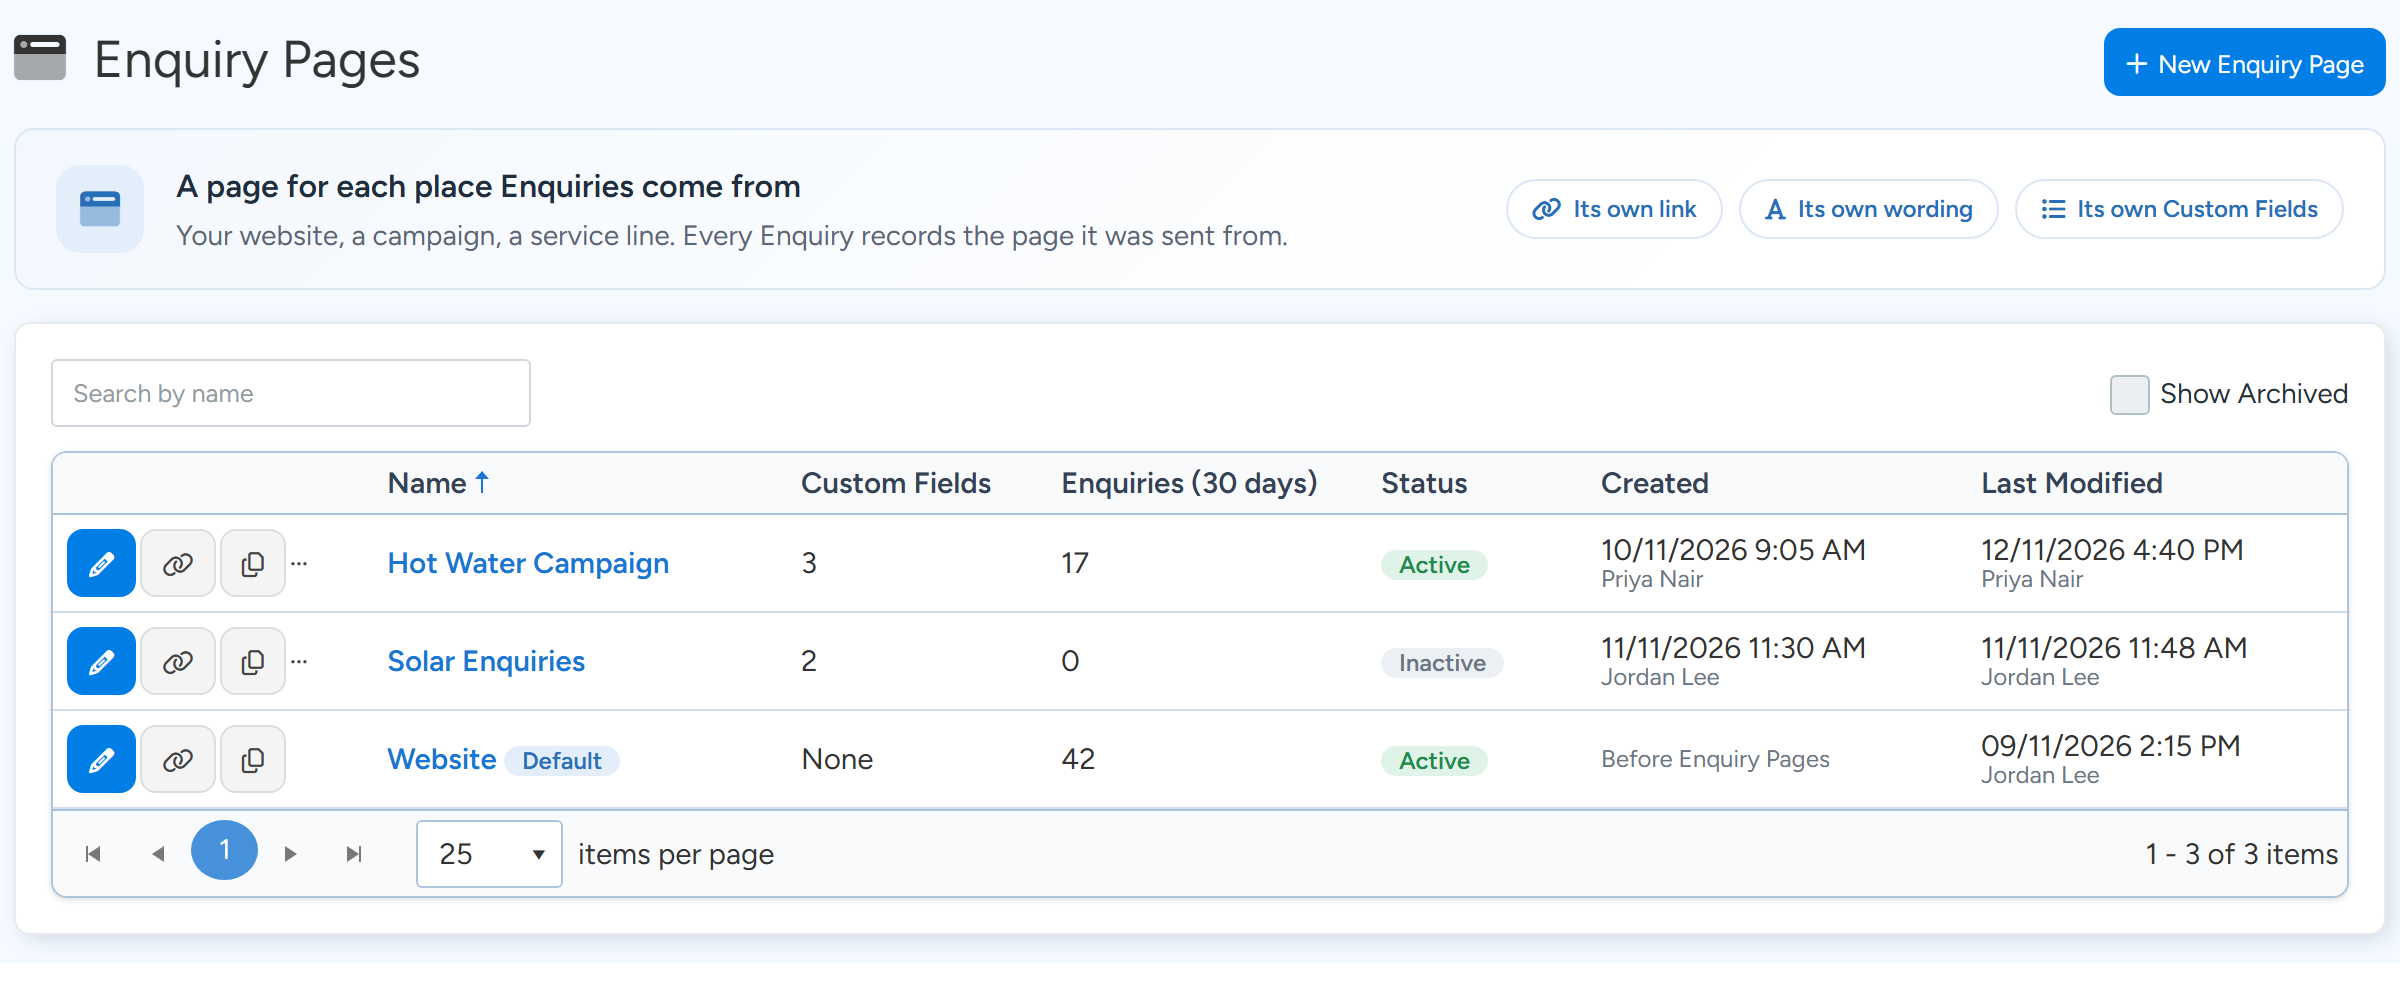
The Enquiry Pages list opens. It shows each page with its number of Custom Fields, the Enquiries it received in the last 30 days, its Status, and when it was created and last changed, and by whom.
The Enquiry Pages list. The icons on each row are Edit, Links, Duplicate and Archive. Sample data. Select a page name, or the pencil on its row, to open its settings.
The page marked Default is the one opened by links, iFrames and Web Buttons that do not name a page.
Tick Show Archived to include archived pages in the list.
Add a page
Select New Enquiry Page.
Type a Name.
The name is for your own use. Visitors never see it. Two pages of the same company cannot share a name.
If you have more than one company, choose the Company.
This is the company the page's Enquiries are created for. It is part of the page's links, so it cannot be changed later.
Select Create Page.
The new page starts as a copy of the company's Default page, so its styling and messages are the ones you already use. Its settings open straight away.
Tip
To start from a page other than the Default, select Duplicate (the copy icon) on its row. The new page copies that page's styling, messages, wording and Custom Fields.
Get the links for your website
On the Enquiry Pages list, select Links (the link icon) on the page's row.
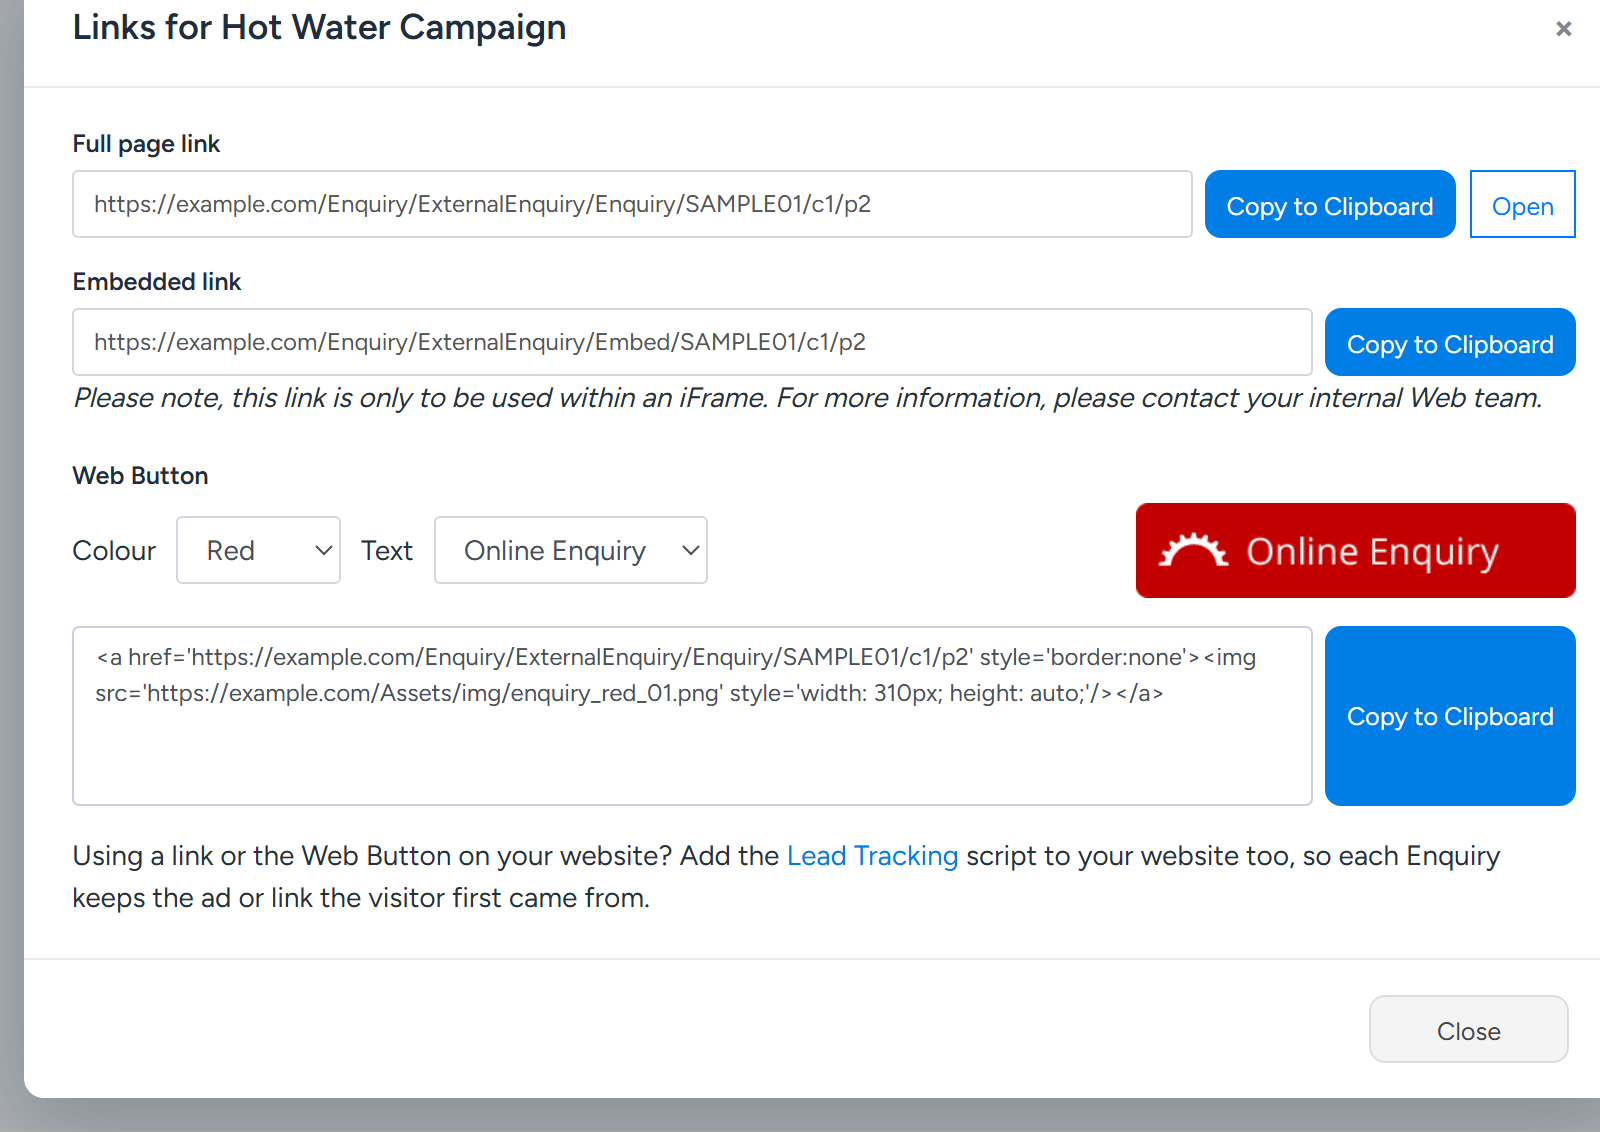
Links for one page. The addresses shown are examples. Sample data. Use Copy to Clipboard beside the link you need.
Full page link opens the page on its own, and suits a menu link, an email signature or social media. Embedded link is only for use inside an iFrame on your website. Open shows the full page as visitors see it.
For a button, choose a Colour and Text under Web Button, then copy the code beneath it.
The text can be Online Enquiry, Book Online or Request Quote.
Paste the link or code into your website, or pass it to whoever looks after your website.
The same links inside a page
The links are also on the page itself. Open the page and, on the Details & Links tab, scroll to Enquiry Link or Button for Your Website. It holds the full page booking link, the embedded booking link and the Web Button. These replace the single web snippet section of the old Enquiries settings screen.
Each page has its own links. Links you copied before Enquiry Pages still work and open your Default page.

What is on each tab of a page
- Details & Links: the page's Name, Active tickbox and Lead Source, and its links and Web Button.
- Labels: the wording on the form and on the thank-you shown after it is sent.
- Custom Fields: your Enquiry Custom Fields, placed on the form.
- Styling & Content: Marketing Opt-In, colours and heading style, the Enquiry Submitted Message, Images and Extra Content.
- Client Email: the email sent to the person who submitted the Enquiry, and its attachments.
- Select Save at the top right after making changes on any tab. Open Page shows the page as it was last saved. Back to List returns to the list.
Set where the page's Enquiries come from
Open the page and stay on the Details & Links tab.
Choose a Lead Source.
Each Enquiry sent from this page is given this Lead Source when Lead Tracking cannot tell where it came from. A customer created when the Enquiry is converted gets it too.
Select Save.
Change the wording on a page
Open the page and select the Labels tab.
The tab shows a picture of the form.
Click any wording on the picture and type over it.
The change is for this page only. A blue dot marks wording you have changed. You can also type it in the Selected panel on the right.
Under Showing, switch from The Form to After Submit to reword what visitors see once the form is sent.
Under Edit, choose As a List if you would rather see every label in one list.
The list has columns for Label, Standard Wording and Wording on This Page.
Select Save.
Note
Reset to Standard puts the selected label back to its standard wording. Reset All puts back every label on the page. Nothing is saved until you select Save.
Add Custom Fields to a page
Open the page and select the Custom Fields tab.
The Fields list on the left shows your Enquiry Custom Fields. Fields are created under Administration > Customisation > Custom Fields, with Enquiry selected.
Drag a field onto the form, where the dashed spots are.
The spots are after Contact Details, after Address, after Attachments, after Work Required, and the right-hand panel. A field can be on a page once. Drag it back to the list to take it off the page.
Click the field on the form to set its options.
Label on this page changes what visitors see. Optional or Required sets whether visitors must answer. Full or Half sets its width. Position, Move Up and Move Down move it, and Remove from Page takes it off.
Select Save.
What a visitor enters is saved to the Enquiry's Custom Fields.
Note
A field that is Required in Custom Fields is required on every page. It cannot be made optional on a page.
Ask visitors about marketing
Open the page and select the Styling & Content tab.
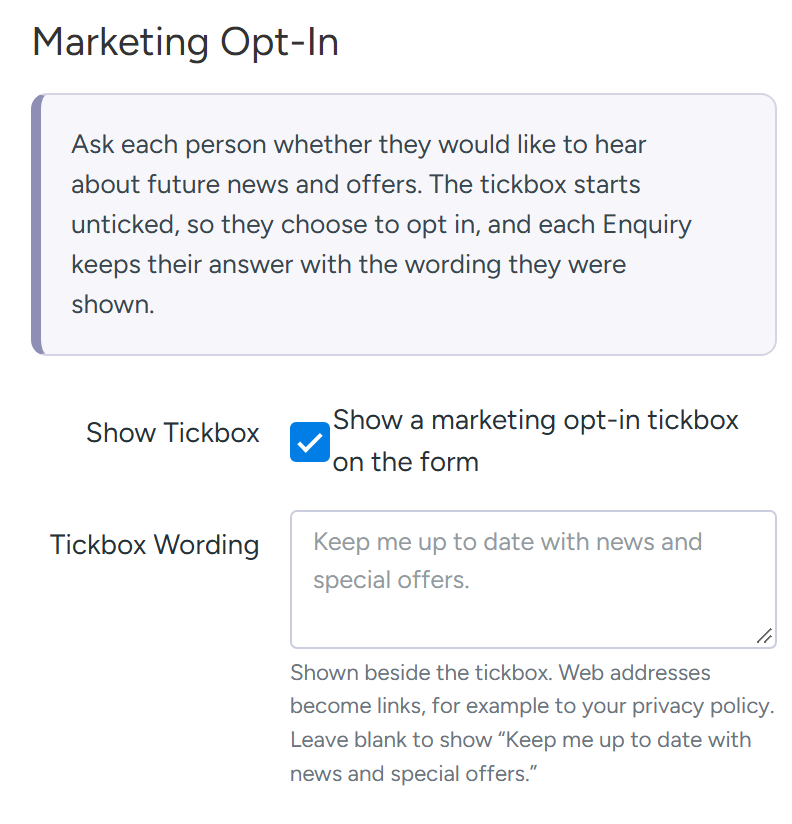
Under Marketing Opt-In, tick Show a marketing opt-in tickbox on the form.
Marketing Opt-In on the Styling & Content tab. Sample data. Type your own Tickbox Wording, or leave it blank.
Left blank, the form shows "Keep me up to date with news and special offers." Web addresses in the wording become links, for example to your privacy policy.
Select Save.
The tickbox starts unticked, so each person chooses to opt in. The Enquiry keeps their answer with the wording they were shown. Its Details tab shows Opted in or Opted out beside Marketing.
Style the page and its messages
- On Styling & Content, under Enquiry Page Styling, set the Heading Colour, Heading Styles (Bold, Italic, Underline), Heading Font Size, Background Colour and Banner Background Colour. The preview beside them shows the result.
- Mobile Number Message is shown beneath the Mobile Number field, for example a consent statement your SMS provider requires. Leave it blank to show nothing.
- Enquiry Submitted Message is the message shown once someone submits their Enquiry. Drag images into it to have them displayed. Preview Enquiry Submission shows how it will look.
- Images holds pictures you upload for use on the Enquiry page and in Email Templates.
- Extra Content is for extra details or specials. It is shown in the right-hand column of the page.
- On the Client Email tab, write the email sent to the person once they submit their Enquiry. Use Select Files to Attach under Email Attachments to attach files to it.
- The page heading and the Attachments and Work Required headings are now changed on the Labels tab, with the rest of the wording.
- The logo at the top of the page is your company logo.
Pause, archive or restore a page
To pause a page, open it and untick Active on the Details & Links tab, then select Save.
Visitors can no longer open the page or send Enquiries from it. Its Status shows Inactive. The Default page is always active.
To retire a page, select Archive on its row in the list and confirm.
Its links show that the form is not available, wherever they are in use. Enquiries already received keep the page's name. The Default page cannot be archived.
To bring a page back, tick Show Archived and select Restore on its row.
What your customer sees
The form has four numbered sections: Contact Details, Address, Attachments and Work Required. Fields marked * are required, and at least one contact number is needed. Customers can drag photos or files onto Attachments or select Choose files. Your Custom Fields and the marketing tickbox appear where you placed them.
After Submit, the form is replaced by your Enquiry Submitted Message, with a line confirming that a confirmation email is on its way to the address they typed. They also receive your Client Email.
Where the Enquiries arrive
Each Enquiry appears in the Enquiries list and records the page it was sent from. Its Details tab shows the Enquiry Page.
Once you have more than one page, the Enquiries list has an Enquiry Page filter. You can also add an Enquiry Page column from the list's column menu.
Copy Custom Fields between Enquiries, Quotes and Jobs
Go to Administration > Customisation > Custom Fields.
Choose Enquiry, Quote or Job as the record type, then select Copy Fields.
The button only shows for these three. The Copy Custom Fields window opens.
Under Copy from, choose where to copy from. Use Search fields to find a field.
Tick each field under the record type it should be copied to.
A field the destination already has is marked Already exists and is not copied again.
Under Place the copied fields, choose to keep the same tab and column, or to add them to the Select Fields list to drag into place yourself.
Select Copy Fields.
Fields copied to Job apply to all Job Types. When an Enquiry is converted, the values of its Custom Fields are copied to the matching fields on the new Quote or Job.
Common questions
Do I need to change the link on my website?
No. The links and buttons you already use keep opening your Default page.
Can I rename a page?
Yes. Change Name on the Details & Links tab and select Save. Visitors never see the name, and the page's links do not change.
Why is the Custom Fields tab empty?
Either Custom Fields are not part of your subscription, in which case the tab says so, or you have no Enquiry Custom Fields yet. Add them under Administration > Customisation > Custom Fields.
Why can I not see the Enquiry Page filter on the Enquiries list?
The filter shows once your account has more than one Enquiry Page.
Where do I set Ratings and Lead Sources for Enquiries?
These are not part of Enquiry Pages. A page only chooses which existing Lead Source its Enquiries get.